-
Select ‘Browse Server’
-
Select the file
-
From the image list if it was previously uploaded
-
Or select ‘Upload’ in the ‘File Browser’ window
-
Select ‘Browse’ or ‘Choose File’
-
Locate the file on your local drive, select it, click ‘Open’
-
Select ‘Upload’
-
Double click the ‘File’
-
To ensure the image is responsive, remove the width and height
-
Add alternative text for accessibility
Once you’ve made the changes you want, click ‘Save’ at the bottom of the page.
To Rearrange Titles on the List
You can edit the booklist and rearrange the products as well! When on the IBD landing page, click ‘Edit’ and scroll down to the ‘Books’ section.
On the left hand side are square arrows with four points, which can be used to re-order the products. Click on the arrow and drag the IBD products into the desired order and then ‘Save’ the changes at the bottom.
Important note: if you previously unpublished an item, it may still appear on the booklist here when logged in as an Admin.
To remove unpublished products from the booklist:
-
On the IBD landing page (‘Independent Bookstore Day’), click ‘Edit’
-
Scroll down to the ‘Books’ section
-
For any product that’s unpublished, click the ‘Remove’ button
-
Save changes
Step 4: Place IBD Block
A pre-made block with one of the IBD logo images is available for stores to promote the event as well. The logo links to the landing page that contains the list of available IBD products the store is selling.
To place the IBD block:
-
Navigate to Structure > Blocks
-
Under the ‘Disabled’ section, look for ‘Independent Bookstore Day Block’
-
Use the drop-down menu in the Region column, select the region you’d like to place the block.
-
Scroll down to save the configuration.
Please note that his block cannot be customized. If you would like to use a different image, a new block is required.
To create a new IBD block:
-
Navigate to Structure > Blocks > Add Block
-
Block Title: This text will be as the header on your block. If you do not wish for a title to be displayed you may leave it blank on your published page. You can also place <none> (including the brackets) in this field to keep it blank.
-
Block Description: Required; this is used to describe your block on the ‘Blocks’ administration page. It should be clear and easy to identify its content.
-
Body: Use the built-in WYSIWYG editor to add text, images, links, and any type of content you would like to create. Here is where you can add a graphic or image of your choice!
-
In the editor, there is an icon that looks like a picture, click on it to open up a second window for image management:
-
Select ‘Browse Server’ and then select the file
-
Select ‘Browse’ or ‘Choose File’
-
Locate the file on your local drive, select it, click ‘Open’, and then select ‘Upload’
-
Double click the ‘File’, enter your ‘Image Properties’ as desired. Please add alternative text for accessibility and remove the image width and height to keep it responsive.
-
Lastly, click ‘Insert image’ to place the image in the body.
-
Link tab - This block should link to the IBD page on your site.
-
URL - Enter a URL in this field to send visitors to the location when they click on the image. As this will point to an internal page, you can use the relative path for the URL. This can be found after the ‘.com’ part of the URL for the Independent Bookstore Page page specifically: Example: www.yourbookstore.com/independent-bookstore-day
-
Target - Select the link target from the options provided.
-
Visibility Settings: There are a few ways in which you can adjust the visibility settings of a block:
-
Pages: You can determine which pages a block appears on. In this case, you may want to limit this block to the front page. To do this, select ‘Only the listed pages’ and enter <front> (including the brackets) into the text field at the bottom.
-
Save Block: Once you have completed creating your block make sure to ‘Save’ it.
Blocks are disabled by default after being created. From the list of all available blocks, head down to ‘Disabled’ to find the one you just created, and place it in a region that fits your theme.
This can be done either by the four-pointed arrow to the left or by the drop-down menu; be sure to save your changes using the button at the bottom of the page.
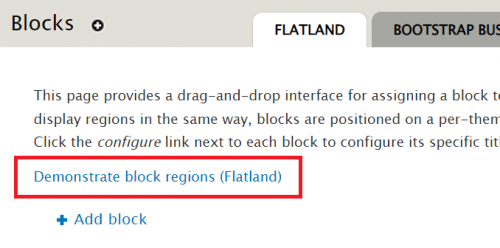
Theme Regions
If you’re not sure which region to place the block in, you can view a ‘map’ of the current default theme. Head to Structure > Blocks, and then click the ‘Demonstrate block region (theme name)’.
Step 5: Not Selling Until Specific Date or Time?
For some stores, it may be imperative that IBD items are available on the site at a specific time or date. Stores are able to set the on-sale date and time for the Add to Cart button to appear for the IBD exclusives (no earlier than 4/27/2024, 12:00AM).
Please note that the time setting on this page is based on the time zone that the store’s website is set to at Configuration > Regional and Language > Regional Settings.
To change the on-sale date and/or time:
-
Navigate to Store > Configuration > Indie Bookstore Day
-
Adjust the date and time as needed
-
The date must be in YYYY-MM-DD format
-
The time must be in 24 hour format
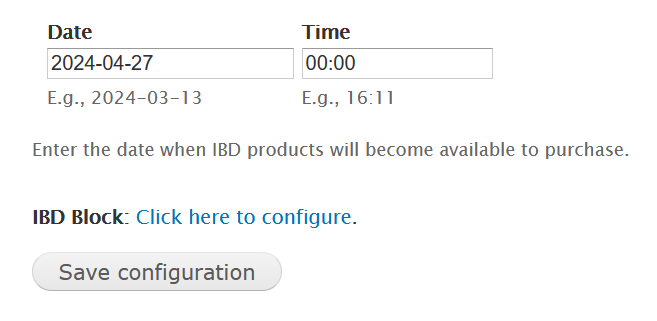
This will adjust the on-sale date and time and update the message that appears on each published IBD product to reflect the new date that was set.
Step 6: Check Out The Changes As a Customer!
It’s a best practice to check any changes to the site as a customer. When doing so, you should not be logged into the site; log out of your account to verify any edits, additions, and other changes you’ve made to the IBD content on your site.
The following are additional steps stores can take outside of the IBD feature for IC and IL:
Step 7: Displaying On-Hand Quantities (IndieCommerce Only)
IndieCommerce stores that want to display available quantities and control how many products are available to customers can do so either via LSI for Non-Books or the Stock feature.
Please note: IndieLite stores unfortunately are not able to display on-hand quantities of products. However, product pages can be unpublished, preventing customers from seeing the page or placing further orders for a product.
LSI for Non-Books
Stock
Stores that utilize the Stock feature have a slightly different workflow to display on-hand quantities of the IBD products.
To update on-hand quantities using the Stock feature:
-
Click ‘Content’ and find the product you aren’t selling
-
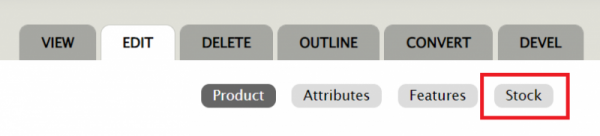
Go to ‘Edit’
-
At the top of the page, select ‘Stock’
-
On the next page, you’ll see:
-
Active Checkbox:
-
Stock
-
Threshold

-
Enable the ‘Active’ button for the product
-
Enter the ‘Stock’ amount - this is the total stock count you have to offer
-
Enter the ‘Threshold’ amount - when this count is reached, a ‘Threshold’ email will be triggered and sent to an assigned email address.
-
Save changes
This will update the on-hand quantities of products available.
Step 8: Excluding Items From Media Mail Shipping (IndieCommerce Only)
Some of the IBD-exclusives are not eligible for Media Mail and will need to be excluded from this particular shipping method. The quickest way to do this would be to set up a condition that excludes the IBD Product Class from media mail shipping methods that your website offers.
Please note: IndieLite stores do not have access to creating conditions on shipping methods. If you need IBD items excluded from Media Mail, please email
[email protected] and a member of the support team will assist.
To create a shipping condition that excludes the IBD Product Class:
-
Navigate to Store > Configuration > Shipping Quotes
-
On the shipping method for Media Mail, click ‘Conditions’

-
Click ‘Add New Condition’

-
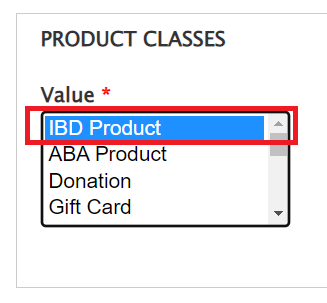
From the drop down menu, select ‘Check an order’s product classes’
-
On the next page, under ‘Value’, select ‘IBD Product’
-
Check the box next to ‘Negate’
-
Save
This creates a condition based on a ‘Not this Product Class’ logic that prevents the Media Mail shipping method from appearing for orders with an IBD product in the cart.
Optional Step: Selling Independent Bookstore Day T-Shirt from Bonfire (IndieCommerce Only)
IndieCommerce stores can create a custom product for the IBD T-Shirt if that’s being sold along with the IBD exclusives. This involves using a custom product class along with attributes and options to offer size and color variations as needed.
NOTE: Because the ‘IBD Product’ product class is directly tied to the IBD date settings (and thus prevents the sale of those items prior to the set date), it is recommended that you use either a pre-existing product class you use for similar merchandise or create a new one. This will allow you to sell the shirt ahead of IBD.
Optional Step: Restricting Quantities (IndieCommerce Only)
IndieCommerce stores can restrict the quantities per order for a particular custom product. IBD exclusive products are, due to their nature, custom products outside of the book data system. This can be handy if a store would like to limit the quantity of a product that can be added to an order.
NOTE: This does require an additional feature to be enabled on your site. Please contact
[email protected] for more details.
-
To restrict the quantity of an IBD product:
-
Click ‘Content’ and find the product you want to restrict quantities of
-
Go to ‘Edit’
-
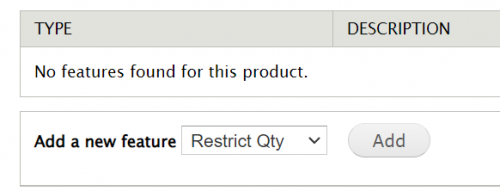
At the top of the page, select ‘Features’
-
From the drop-down menu, select ‘Restrict Qty’ and then ‘Add’
-
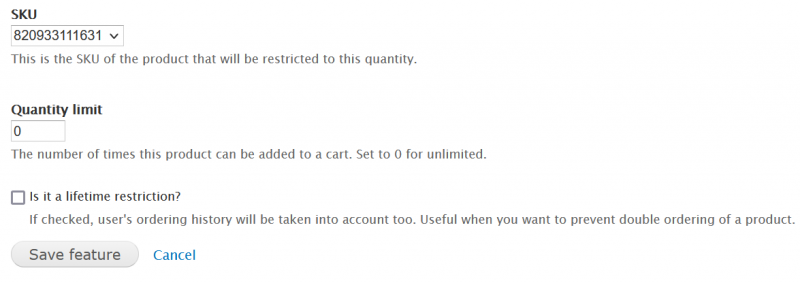
On the next page, you’ll see the SKU of the product and a field to enter a quantity limit. Enter the maximum quantity you’d like for a customer to be able to purchase. Ignore the setting for a lifetime restriction.
Enabling this for a product will not allow for the quantity of the product to be adjusted in the cart.
In addition, if a customer attempts to add more than the maximum quantity to their cart from the product page, they are sent to the cart page with an error message of ‘You may only add # (product name) to your cart. Quantity has been restricted.’